How to configure WebSocket based DSC for WBIFMS [Download Software]
This document proposes a new approach for performing digital signature in a web browser using web sockets technology of IFMS Signer. The main purpose of this approach is to eliminate dependency on Java applet at the client side and browser dependency to provide a reliable alternate solution. This article is showing the process of configuration of WebSocket based DSC for WBIFMS.
Intended Audience:
All IFMS Users using DSC.
Overview of WebSocket based DSC:
To get the facility of socket based DSC Authentication, user needs to install ‘IFMS Signer’ software module in their system, with the administrator login, for the first time. Going forward, it will automatically open the certificate window to select and validate the user certificate.
Pre-requisites:
1. The system should have JRE 1.7 (32-bit) or above.
2. ‘IFMS Signer’ installation should be done with administrator privilege.
Restriction/Limitation of WebSocket based DSC:
Web Sockets will not run if the proxy is enabled in Client Machine. Disable the proxy and start the Signer Server. Proxy Server must be capable of handling Web Socket communication.
Steps to install & run of IFMS Signer and test of Web Socket in PC:
Major steps in brief:
a) Download & Installation of IFMS Signer File (around 52.27 MB) in the PC from the URL / Emudhra Portal where it is available. Click Here to Download (If link is not working, please see details stapes below.)
b) Restart the PC.
c) Double click on icon “IFMS Signer” to run the file successfully.
d) Open a new tab in Firefox browser and browse https://127.0.0.1:2037 and add as exceptions.
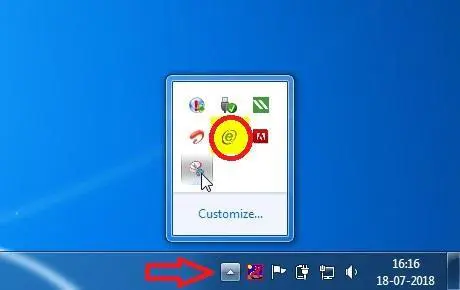
e) Check whether IFMS Signer is running or not. Double click on “ e ” sign in the Bottom Right corner of the Task Bar of the PC. It will open a WBIFMS socket consol.
f) Insert DSC in PC & check whether DSC is successfully working in IFMS as per existing procedure.
g) Click on “Test Socket” in the top of the Home Page of IFMS Application Page (just after Login page).
h) In the Web Socket Output Box, it will be shown as “Connection Opened”.
i) Click on “test_websocket” and after few seconds Certificate page will appear where the name of the user will be shown. Click on “Sign” and enter the Password of DSC (viz. CRG1234$ etc.) the message “WebSocket tested successfully” will appear in the output box.
Now the PC is ready to use in the new system also. The DSC will be working as per existing procedure (Applet based D-Sign) until new WebSocket based
D-Sign in introduced in IFMS. After switching over to the new Web Socket based D-Sign system the existing DSC will only work if the above-mentioned steps are properly followed.
Steps in details:
1. Download the IFMS Signer installer from the download button below and Extract the file of IFMS Signer.msi
2. Open the “Downloads” folder or click on download sign. Then install/Run the “IFMS Signer.msi” file. If it asks for any access, accept (by clicking next/yes) it.
3. It will create a short-cut on the desktop. For the first time, run it as administrator by double click on the IFMS Signer icon.

4. After successful run, success popup will come up as below.
5. Next to allow security exception for browse https://127.0.0.1:2037
Open a new tab in Firefox browser and browse https://127.0.0.1:2037
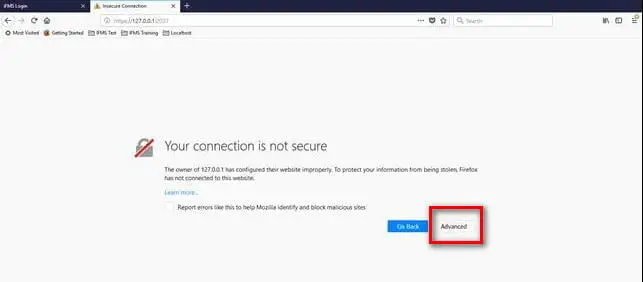
Click on ‘Advance’ tab
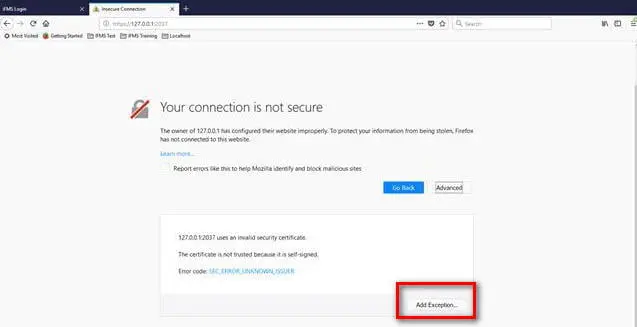
Select ‘Add Exception..’ tab.
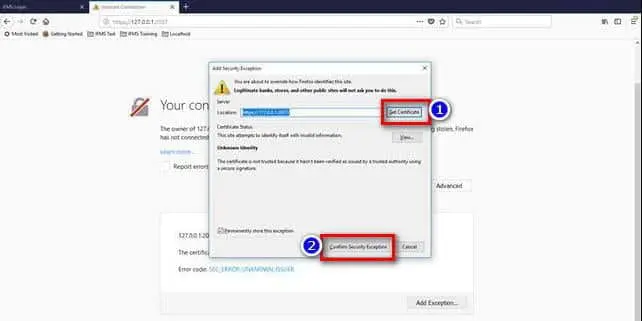
Now Add Security Exception window will open. Select ‘Get Certificate’ tab and then click on ‘Confirm Security Exception’.
6. Check whether IFMSSigner is running or not.Double click on “e ” sign marked as a red circle. It will open a WBIFMS socket consol.


Close the tab by click on top right corner box.
7. Restart the Computer
8. Then log in to the IFMS portal by the respective user like TO/ATO/DDO/Online PL etc.
through their Login id & Password.
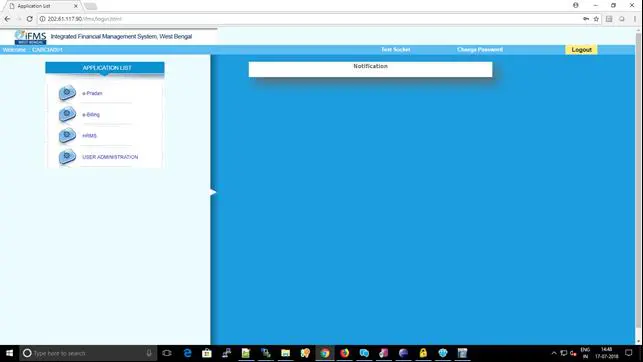
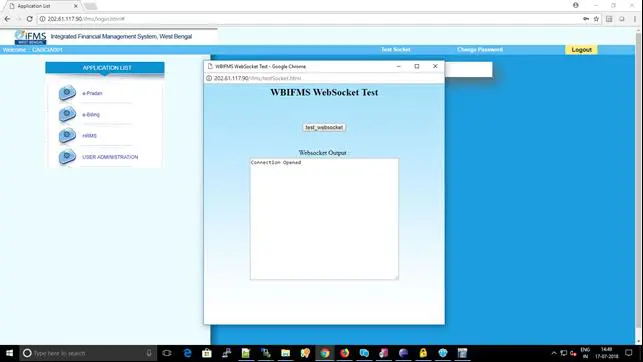
9. After successful login, Click on ‘Test Socket’ option on the menu bar. Then the web socket test window will open. Now ’Connection Opened’ message will be shown in the output box.
10. Again Click on ‘test_websocket’, now the certificate window popup will open automatically. Then select the certificate and click on the sign by entering DSC Password (Viz. CRG1234$ etc.).
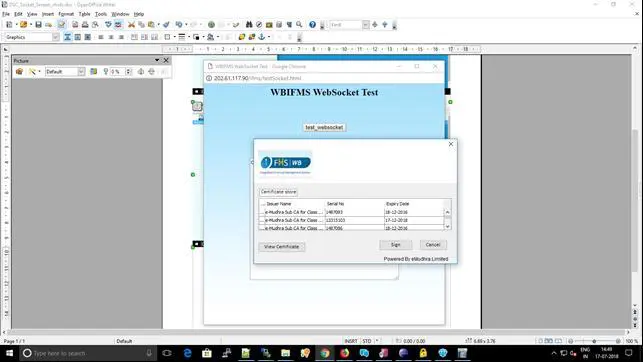
If certificate not showing then click on “e ” sign marked as a red circle.
11. After successful test ’WebSocket tested successfully” message will be shown in the output box.

12. Close the Test Socket window.
Signature verification /authentication process is same as earlier.
Frequently Asked Questions (FAQs):
Q1. Sometimes web socket is not working properly. The certificate window is not getting open. What shall I do then?
👉 If you are getting this kind of issue just follow the below steps.
Check whether IFMSSigner is running or not.

Q2. In case of any problem during installation of IFMS Signer File, Web socket D-Sign related problem of eMudhra, it should be reported through Web Ticketing System of eMudhra (User Manual available under Guideline of IFMS)
a) All DSC related problem of IFMS (after implementation of Web Socket) will be reported in this way? How IFMS users will identify the problem not related to IFMS application before reporting to eMudhra?
>>Yes all DSC related problems to be reported this way. The problem where the users have plugged in the token and are unable to see the certificate to sign pertains to the DSC related problems. Only such problems are to be reported through the system.
b) Is registration required by all IFMS users before implementation of Web Socket? Or registration is only required for reporting of the problem to emudhra by Web Ticket.
>>If any user faces issues, he or she needs to use this tool to report. It is suggested that the users are pre-registered in the system so that they can easily report as and when they encounter any problem.
c) If one IFMS user has multiple user ID; whether the user has to register all User
IDs or single User ID separately?
>> Single ID registration will be sufficient. While raising an issue, they can mention the
User ID in which they are facing the problem.
d) If a user has multiple User ID in IFMS, whether the User can report the problem through any of the User ID which was registered earlier?
>> Same as the answer for point c.
e) Reply to the user can also be made through registered email id / SMS / phone to
the registered mobile no?
>> Reply will be sent to the registered email ID if required.
f) In case of transfer/retirement of a user, the previous user id shall be valid?
Problem can be reported through previous registered user ID?
>> No. The same needs to be intimated to emudhra so that they can deactivate the
user and for new IFMS user, need to complete the registration process again.
g) Is their any validity period of User ID after registration? How it can be unlocked
(if locked)/ extended ?
>> The userids will be valid as long as the user is active in the system. Issues regarding
the system can also be reported through support team via an email:
[email protected] and call at +91 80 4227 5361.
h) Any MIS for unresolved / pending/ resolved Tickets can be available at Finance
Department end to monitor the whole scenario?
>> Yes. Detailed report of the pending issues and the status of the tickets will be
provided. Access to the system will be provided to check the status of the tickets.
In case of problem in IFMS, you are requested to report it through IFMS Call Logging System. If the problem is still not resolved after a reasonable time you may send mail to [email protected]/ [email protected] at E-Governance Group, Finance Department, Government of West Bengal, NABANNA, Howrah-711102, Contact No: 2253-5417/5224 .
Thank you :)